by T. Payton | Aug 23, 2018 | Final Cut Pro X
The x264 difference
Note: Handbrake Helper is currently not working in Big Sur because of keystroke permissions. If you get it working, drop me a line.
Note: macOS Mojave 10.14 and above users see note at end of article.
Lately, while working on web projects, I’ve needed to get my h264 files down to the smallest possible. While the h264 encoding that Apple has built into FCPX is accelerated on most Macs, the x264 encoder (notice the “x”) that part of Handbrake typically gives me up to 10 times size savings with minimal visual change. Amazing, I know. While you may think that all h264 encoding is the same, x264 is a big deal. As far as I understand it, h264 is actually a standard for decompression, not compression. The secrete sauce of x264 its in incredibly efficient compression. The flavor of h264 compression that from Apple is excellent, and it is built into intel chips for super speedy compression. x264 on the other hand is CPU dependent so will use up your cores, but over the years of refinement it has become super fast, efficient and makes small file sizes tiny. So if you are delivering for a website background video for example, where size is everything, it imuch better to go with x264 than h264. For my everyday work and prefect compatibility, h264 is super fast and looks great.
While there is x264 Quicktime component that you can use in Compressor, it hasn’t been updated for over a decade, and it doesn’t give as nice of results for anything beyond 720p and is now where near as efficient as the most recent releases of x264.
A better workflow for FCPX and x264
Using Handbrake can be a bit clunky with FCPX as far as finding exported files, adding them to Handbrake and exporting. To make things go a bit smoother with FCPX, I created a little Automator App that will add any single movie file dragged on it to the HandBrake queue and start the queue. Setup in FCPX is simple, add it as a destination for the “open with” option in settings and then when you share timelines in FCPX, they will be added to the handbrake queue and encoded.
FYI. If you’re encodes go really quick, you’re going to see some warnings pop-up in Handbrake. If it really is an issue, contact me and I”ll make a try to make a version that takes that into account.
Download it:
 Handbrake FCPX Helper 1.0 (December 2019(
How to use it:
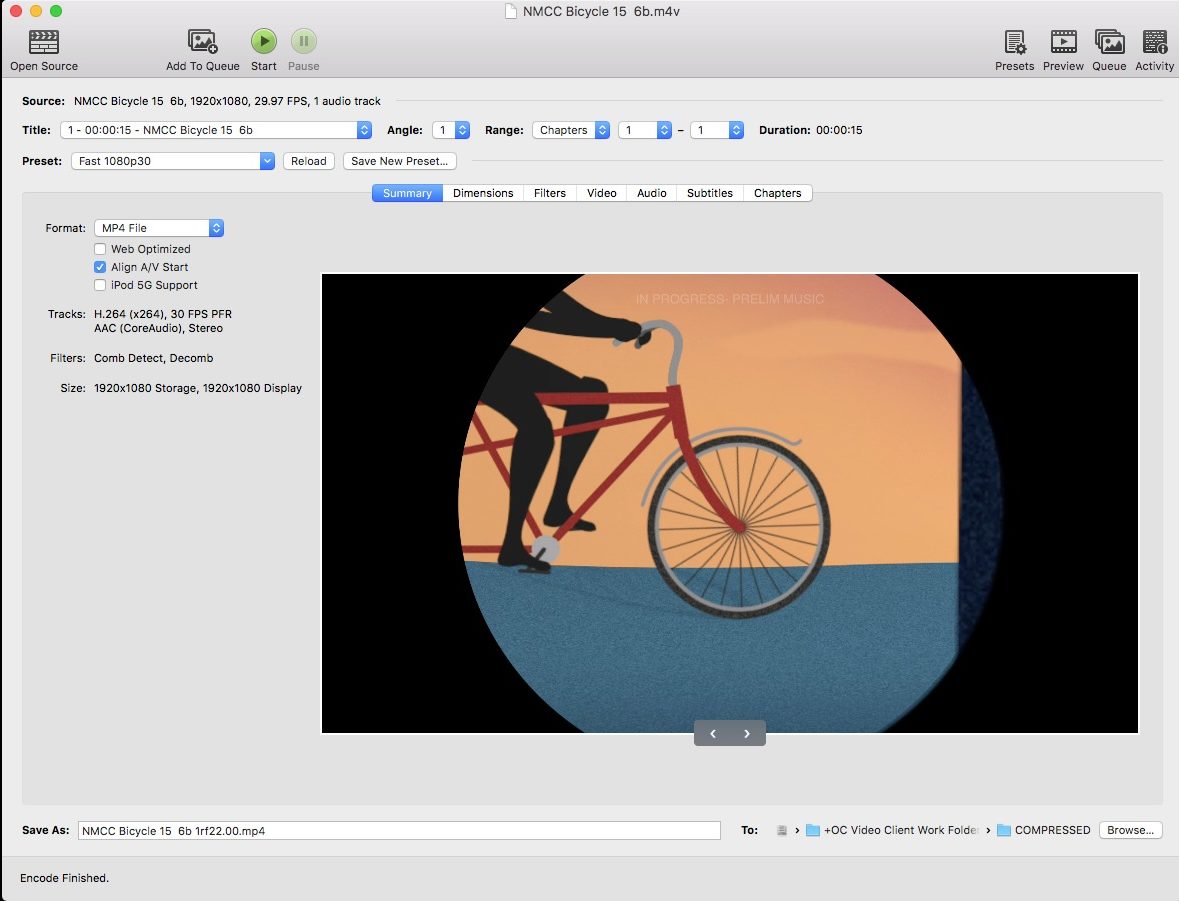
In FCPX: Here is what it looks like to setup in share dialog.
In Handbrake: I’ve set a folder destination called “Compressed” where all my handbrakes are dumped too. Note that the default present will be used, so use “Make Default Preset” to whatever you like.
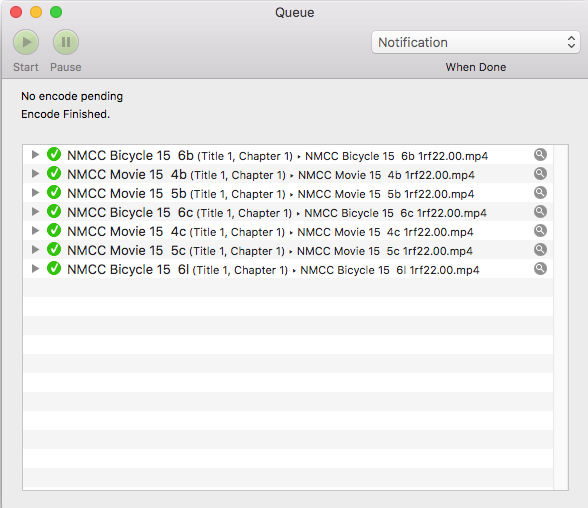
Handbrake Queue. I had a bunch of spots to export and it compressed them as they were exported in FCPX.

For this 15 second broadcast spot, handbrake is 5.8MB while Apple Devices 1080 is 18.8MB. Less than 1/3 the size. Sweet.
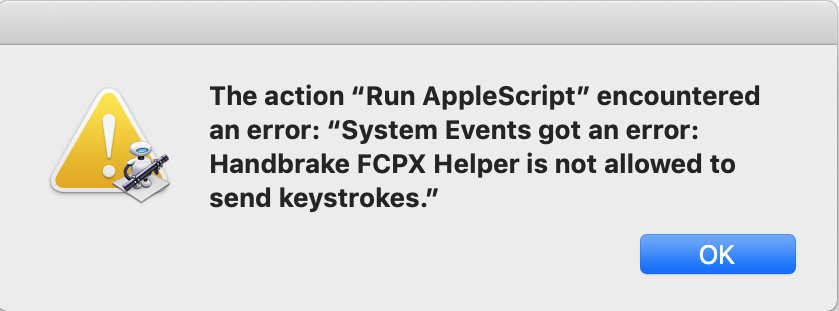
Summer 2021 update – Big Sur Troubles
I’m having trouble getting HandBrake Helper to work with Big Sur. Right now I can’t get it beyond “not allowed to send keystrokes”. Sorry. Working on a fix.
Fall 2018 update – Adding Access in Mojave (and beyond)
If you’re using HandBrake FCPX Helper in macOS Mojave (or greater OS), you may have noticed an alert:
If you encounter this, just head over to System Preferences > Security & Privacy and then on the privacy tab enable Handbrake FCPX Helper. 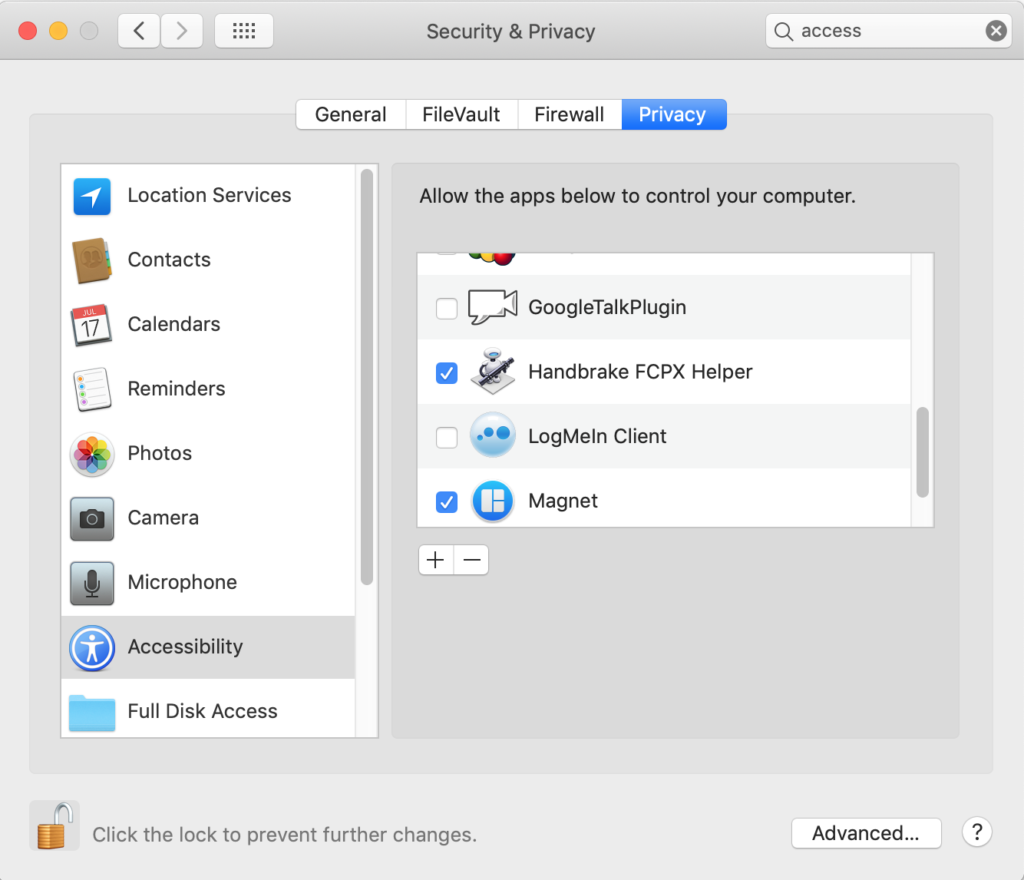
by T. Payton | May 14, 2018 | Final Cut Pro X
Updated 5-15-18 with additional information on FCPX Pan Law Compensation. Every few months or so I see this comment on Twitter or Facebook: “FCPX is lowering my audio -6db. It’s totally messed up!” What is happening is actually half expected and half an odd implementation of the Stereo Pan Law.
Definition of the Stereo Pan Law
According to Wikipedia:
The Pan Law states that any signal of equal amplitude and phase that is played in both channels of a stereo system will increase in loudness up to 6.02 dBSPL
You can read up about it here on Wikipedia, or I’ll do my best to explain below with some illustrations. 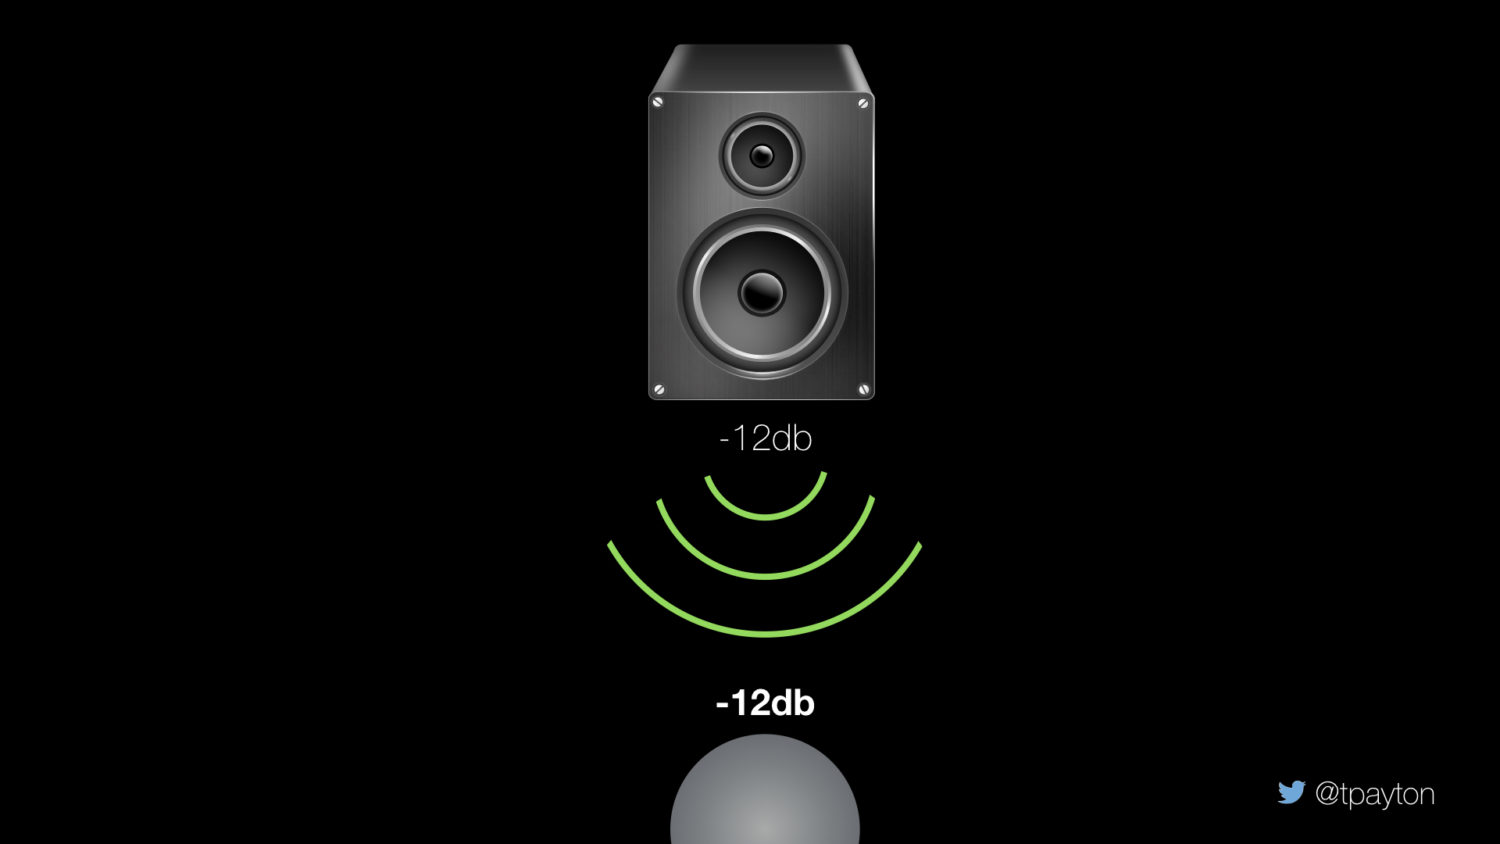 Figure 1 – A mono speaker playing a -12db signal hits you ears and you hear a -12db signal. Simple.
 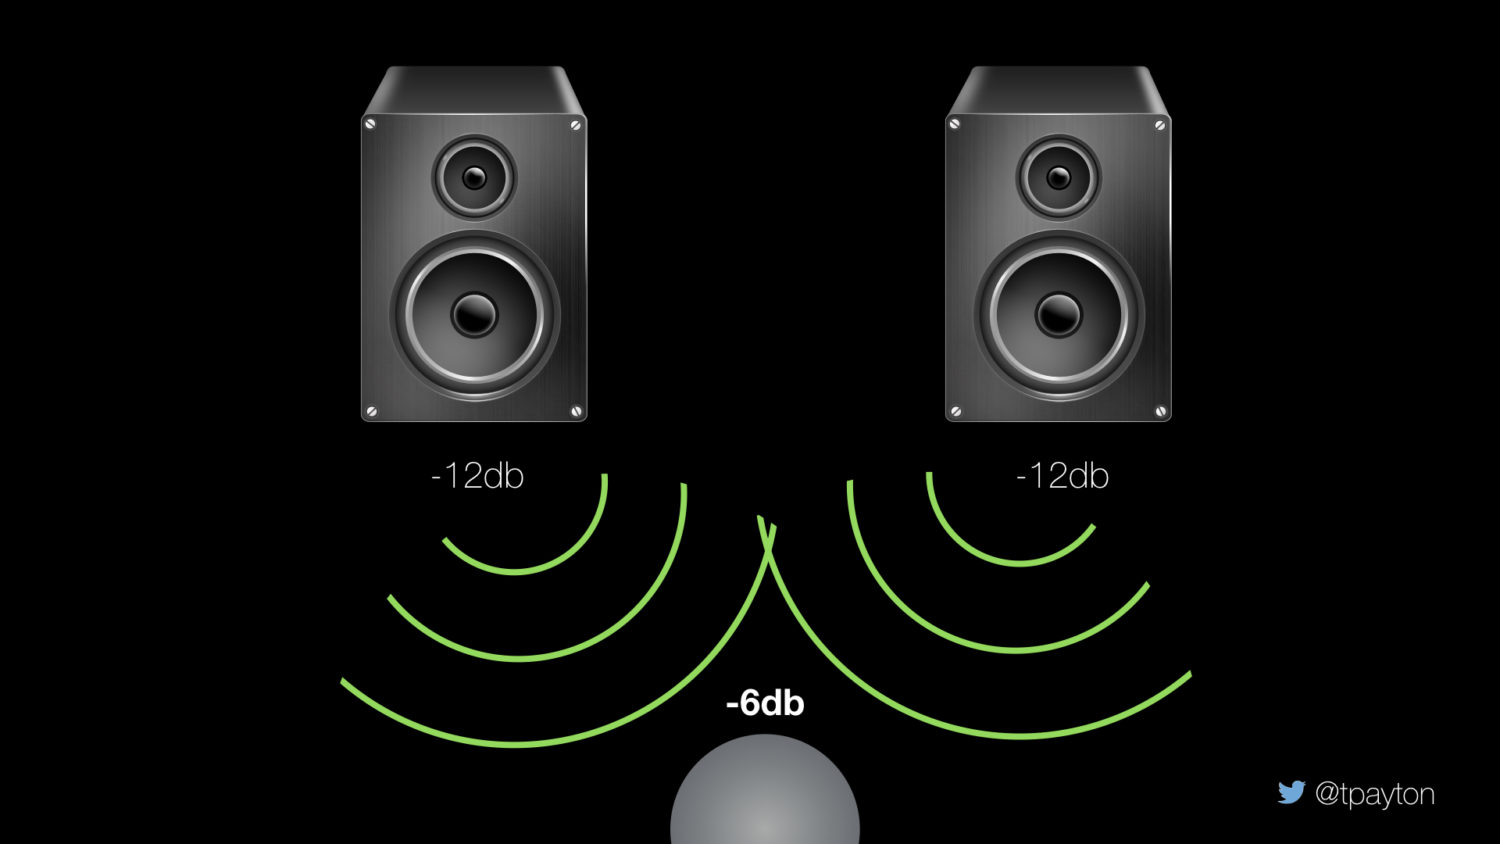 Figure 2 – A set of stereo speaker each playing a -12db signal hits you and you hear a -6db signal. Interesting eh? The sounds have combined from two speakers and the level is raised about 6db
The Pan Law in a NLE
Place a mono audio clip with -12db signal in a stereo timeline in any NLE or DAW, and panned it to the center and the resulting stereo meters will not show -12db on both channels but something lower: usually between -3db and -6db lower. NLEs and DAWs know about the Pan Law and have built in compensation for it. Here is what it looks like with audio meters: 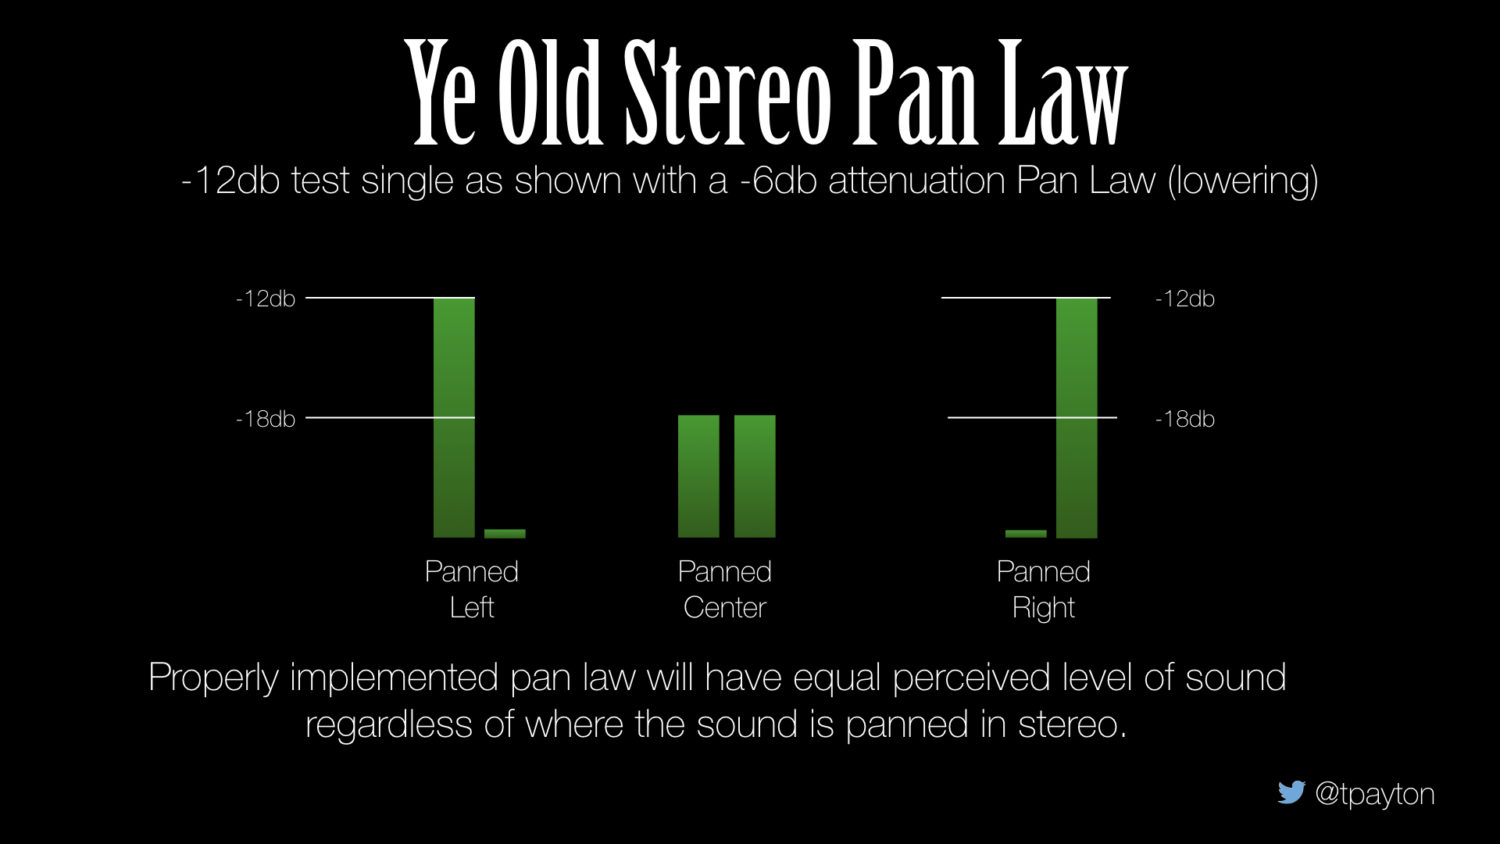 Figure 3 – This is what should happen with the pan law in a NLE or DAW.
Missed it by that much! The Pan Law in a FCPX.
The pan law is nothing if not confusing and it was apparently that for someone on the Apple Professional Apps team. They understood pan law compensation differently from what I have described and beginning with the release of SoundTrack Pro in the mid 2000’s and during that time FCPX development they got the same treatment. (Logic doesn’t suffer from this). Apple applied the MOST GENEROUS -6db theoretical level to compensate for the pan law to ALL signals regardless of stereo pan setting. So a -12db mono signal will be lowered to a -18db stereo signal. And now that you know about the pan law this in fact makes sense, although the -6db may seem extreme. The failure comes because FCPX doesn’t compensate correctly for the pan law because there is no actual ‘pan’ compensation. For example when you pan that -12db mono signal left or right and FCPX doesn’t raise the level back to -12db. While the stereo panning might or might not be a problem for you, the rather aggressive -6db level change most likely will come as a shock. (Note this behavior is as of version 10.3.4 and I haven’t done tests on the latests FCPX.) 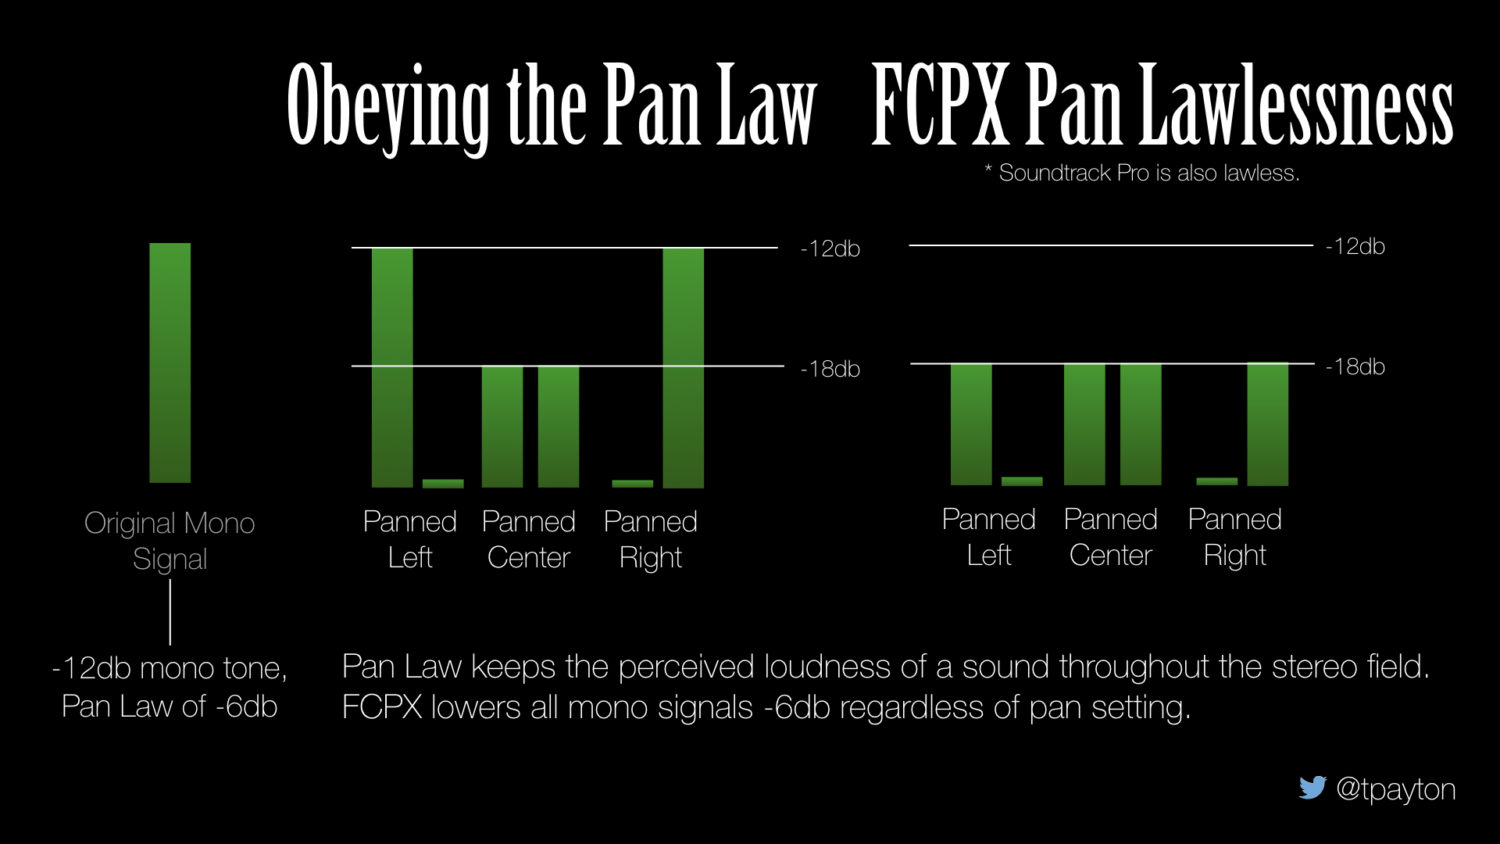 Figure 5 – Sadly FCPX doesn’t actually obey the pan law correctly and applies a -6db attenuation to all mono signals regardless of pan settings.
FCPX Pan Law Problems…. (i.e Bugs!)
The FCPX Pan Law implementation becomes most problematic when you are adjusting a mono channel audio in a multicam clip—for example with a compressor or limiter— and then place that multicam clip in a stereo timeline. It may be a perfect level in the angel of the multicam clip but in the stereo timeline it’s level is significantly different. Actually it is exactly 6db lower. You will be further aggravated when you place a stereo effect such as a limiter on that clip in the timeline and now whatever you do the output will only peak at -6db! Yikes! What if you put the project then in a compound clip? Does the limiter still only peak at -6db? Yes, yes it does. It’s enough to drive a poor editor nuts. But before you throw you Mac out the window there are workarounds.
Workarounds
While I have painted a bleak picture of the Pan Law Compensation in FCPX, it probably won’t effect you in your final mix because if you have ANY stereo or surround clip in your final compound clip mix then limiters and compressors will work as expected. Just pay more attention to relative levels on your roles (behaving as busses here), rather that absolutely levels, and then place a final limiter or level adjustment on your complete mix. Now if you happen to have only mono material, one way to bypass the FCPX pan law compensation is to give you mono channels a pan mode of “Dialogue”. This will remove the mono channel from stereo and therefore the FCPX pan law companion will be disabled. Secondly you can add gain or increase the level manually after your effects because that last bit of gain isn’t seen by the FCPX pan law compensation. (Note: There is no such pan law for surround sound that I know of, so the pan law is really better called the stereo pan law, and will only effect you when creating stereo mixes.) 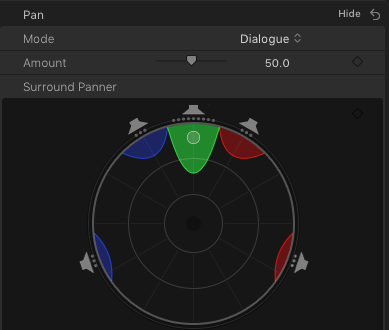 Figure 6 – the FCPX audio pan inspector. Changing mono signals to Dialog will prevent FCPX Pan Law Compensation.
What to do.
Obviously from the tile of this section, I think this is a not expected behavior but in fact a bug. As of 10.4 the issue is still present. Fixing it might be tricky for the FCP team, and cause them to eat some humble pie, but they can do it if the desire, especially if enough editors give them feedback about it. If you have encountered this bug, or even if you have not and are just reading this article, then please provide feedback to the FCP team and let ask them to fix this issue.
by T. Payton | Apr 25, 2018 | Final Cut Pro X
I have heard from colleagues of their trouble with AVCHD media, shot on the sony FS700 in particular. FCPX crashing, being as slow as molasses and not able to share (export). So after good amount of sleuthing I discovered a few issues and tips. So here they are in no particular order:
MTS Files = Media Transcoded by Satan**
Okay, that is a bit of hyperbole. But only a bit.** MTS files are enough to make a FCPX editor cower in the corner. Bring them into FCPX and sure they play… sorta. But they will wreak havoc on your edit. If you ever find yourself with MTS files realize you probably shouldn’t have them. Mpeg Transport Streams are part of the AVCHD bundle, and they belong in the bundle, not separate if you can help it.
AVCHD Bundle Thingie
The elements in the AVCHD bundle is not designed to be separated — there is essential metadata in there, for example MTS files are NOT shots but rather elements of shots — if you have a long shot it will be divided into multiple MTS. MTS are h264 (well at least in theory) as well as compressed audio. Both audio and video are efficiently stored in there… but almost no NLE can play them back completely efficiently. In FCPX it make LOOK like it is playing back a few files efficiently, but try to deal with more than a handful of shots and you will enter molasses land.
Transcode & Rewrappage AVCHD
In MTS, Audio is as much as a problem as video. Therefore, you need both Audio and Video to be rewrapped and or transcoded from a MTS file, as well as injecting metadata – timecode for example. Fortunately FCPX will do all this transcoding automatically on import of AVCHD! Sweet, that is if you use the Import dialog. If your coming straight from the card, its easy.. If you are first copying a card to a drive, then make sure you get the entire folder structure of the card, or use something like excellent Hedge for this task. Using the Import window, FCPX will wrap them in a mov container and also transcode the audio intro straight PCM audio so it plays back as smooth as butter. If you dig in you’ll see your files sizes are slightly larger than what was on the camera card, but that is because of uncompressed audio.
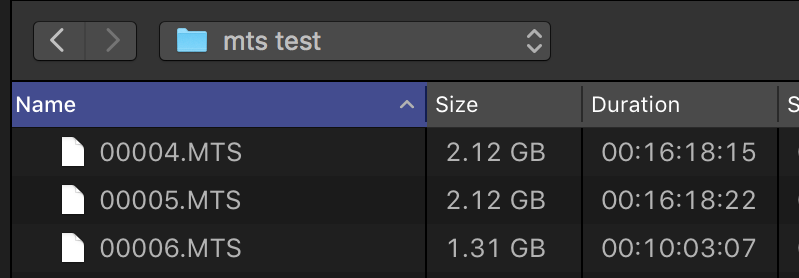
Figure 1: Here a few orphaned MTS files from a 42 minute lecture. They kinda play in FCPX, but are really slow. These 3 files are a total of 42 minutes and a size of 5.54 GB.

Figure 2: The AVCHD bundle that contained the above MTS files, but now imported via FCPX import. It is now as it should be a single 42 minute clip from the recorded lecture. It’s 8.06GB, so 2.5 GB larger because of transcoding it’s 6 channels of MTS/AAC audio to uncompressed.
What to do with an orphaned MTS file?
You can bring those into FCPX and optimized, but in my testing, creating optimized media of MTS files in FCPX, doesn’t work perfectly with every MTS file. It might be the different flavors of MTS (still investigating this), or could be that audio is being passed through when making optimized and proxy. Regardless if you do have a stray MTS file the best option is to spend a few dollars to save some headaches and purchase Clip Wrap, or Edit Ready, to rewrap them properly (even in just rewrapping ClipWrap will transcode the audio into beautifully efficient uncompressed).
So there is no need to EVERy goto ProRes for AVCHD?
Probably not, but rewrapped AVCHD h264 might still not give you the performance your looking for in FCPX. For example, malformed h264 files are all over the place because h264 is a decoding standing not an encoding one — you can therefore can get widely different results from different compression methods. Malformed h264 can give color shifts, bad performance or export errors in FCPX. Is AVCHD h264 malformed? I don’t know, but it seems to take a bit more processing power than the Canon DSLR h264 footage I edit with most of the time. Therefore I would attempt to edit FCPX imported AVCHD and see how it goes with your project. It will probably be fine, but If you have trouble try optimizing in FCPX. If it is still not primo, on your next project you want to make things more efficient and drive space is not an issue, use ClipWrap, Edit Ready or other solution. On the other hand, ProRes does increase the data rate that needs to be read off storage, so you could actually see a decrease in performance using a high bandwidth ProRes if your storage is not up to the task. Its the same way that it is faster for a browser to read a tiny JPEG, decompress it and display it, than for it to read a TIFF or PNG that is many times larger, not have to compress it and display it. Make sense?
Enjoy!
T.
** In my attempt at humor, I’m not meaning to dismiss Satan as fictitious. Jesus didn’t, and I’m with Jesus. 🙂 See my Me page if your are interested.
by T. Payton | Aug 23, 2017 | Final Cut Pro X
I received an email today asking this:
I read a post you wrote back in 2013 and I can’t find anything on my question.
So I decided I want to use this to speed up my editing since it gets choppy on playback making it very hard to edit. I would like to know what is the difference in optimized and proxy? Why should I transcode to both or one of them? I have a feeling proxy is the best for quicker transcode and smaller file size. But why would you transcode to optimized or both? Thanks.
Thanks for asking. I’ll be happy to help clarify.
Optimized is a full resolution ProRes version of your clips, while Proxy is a quarter resolution ProRes Proxy version of your clips. The difference in size of the clips and data rate can make a significant difference in the smoothness of editing.
Optimized Media
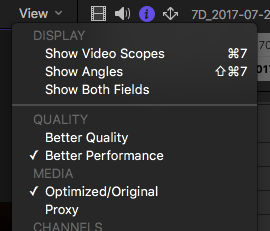
As I said, Optimized is a full resolution ProRes version of your clips. Optimized is most useful when your computer for whatever reason, can’t decode a clip in full resolution fast enough to play back smoothly. On my system, I have trouble playing back some 1080 footage from a particular Sony camera, for whatever reason my FCPX system just doesn’t like it. I also have inexpensive stock footage that although encoded with h264, again just doesn’t play back well. Therefore, I optimize anytime I get this type of footage. Once I optimize it, it makes my editing smooth while still editing and exporting in full resolution. As long as my Media setting is on “Optimized/Original” that is (see image)
The only drawback with optimized is the storage bandwidth and space needed. Since optimized is standard ProRes 422, the data rate for 1080p material is 147 Mb/sec or about 20 megabytes per second. H264 on the other hand is in the 50 Mb/sec range or 6 Megabytes per second. If you have a 4 camera multicam, you’ve suddenly jumped from needing 12 megabytes per second of bandwidth to 80 megabytes per second. While this isn’t a problem if you have a decent RAID, if your editing on a spinning disk or over gigabit ethernet Optimized footage will quickly saturate it.
You can learn more about ProRes here:
https://images.apple.com/final-cut-pro/docs/Apple_ProRes_White_Paper.pdf
Proxy
Proxy is a quarter resolution ProRes Proxy version of your clips, and not only is the number of pixels reduced by 1/4 but because of the ProRes Proxy codec, the space needed and bandwidth is reduced by another 1/3. The result is that it takes 1/7 the bandwidth and size. This means that for for footage on a codec like Canon h264 1080p material, ProRes Proxy is even significantly smaller.
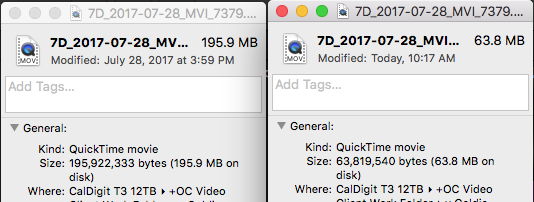
Canon 1080p h264 on the left, FCPX Proxy on the right.
Proxy also switches Final Cut Pro X into 1/4 resolution, so playback, rendering and sharing/export are all at 1/4 resolution. This is the big gotcha with Proxy as you need to be aware of it when exporting as it will render at 1/4 resolution, although it will still export at the pixel size chosen when you share. Personally I use Proxy when I’m working on multicam with more than 3 angles. Instead of struggling to playback, it just flies in Proxy. I also have some older iMacs that I reserve for assistant editors or sound cleanup and transcoding to proxy lowers the CPU usage for that older Mac and also lets us have multiple streams over our gigabit ethernet network.
by T. Payton | Jun 29, 2017 | Final Cut Pro X
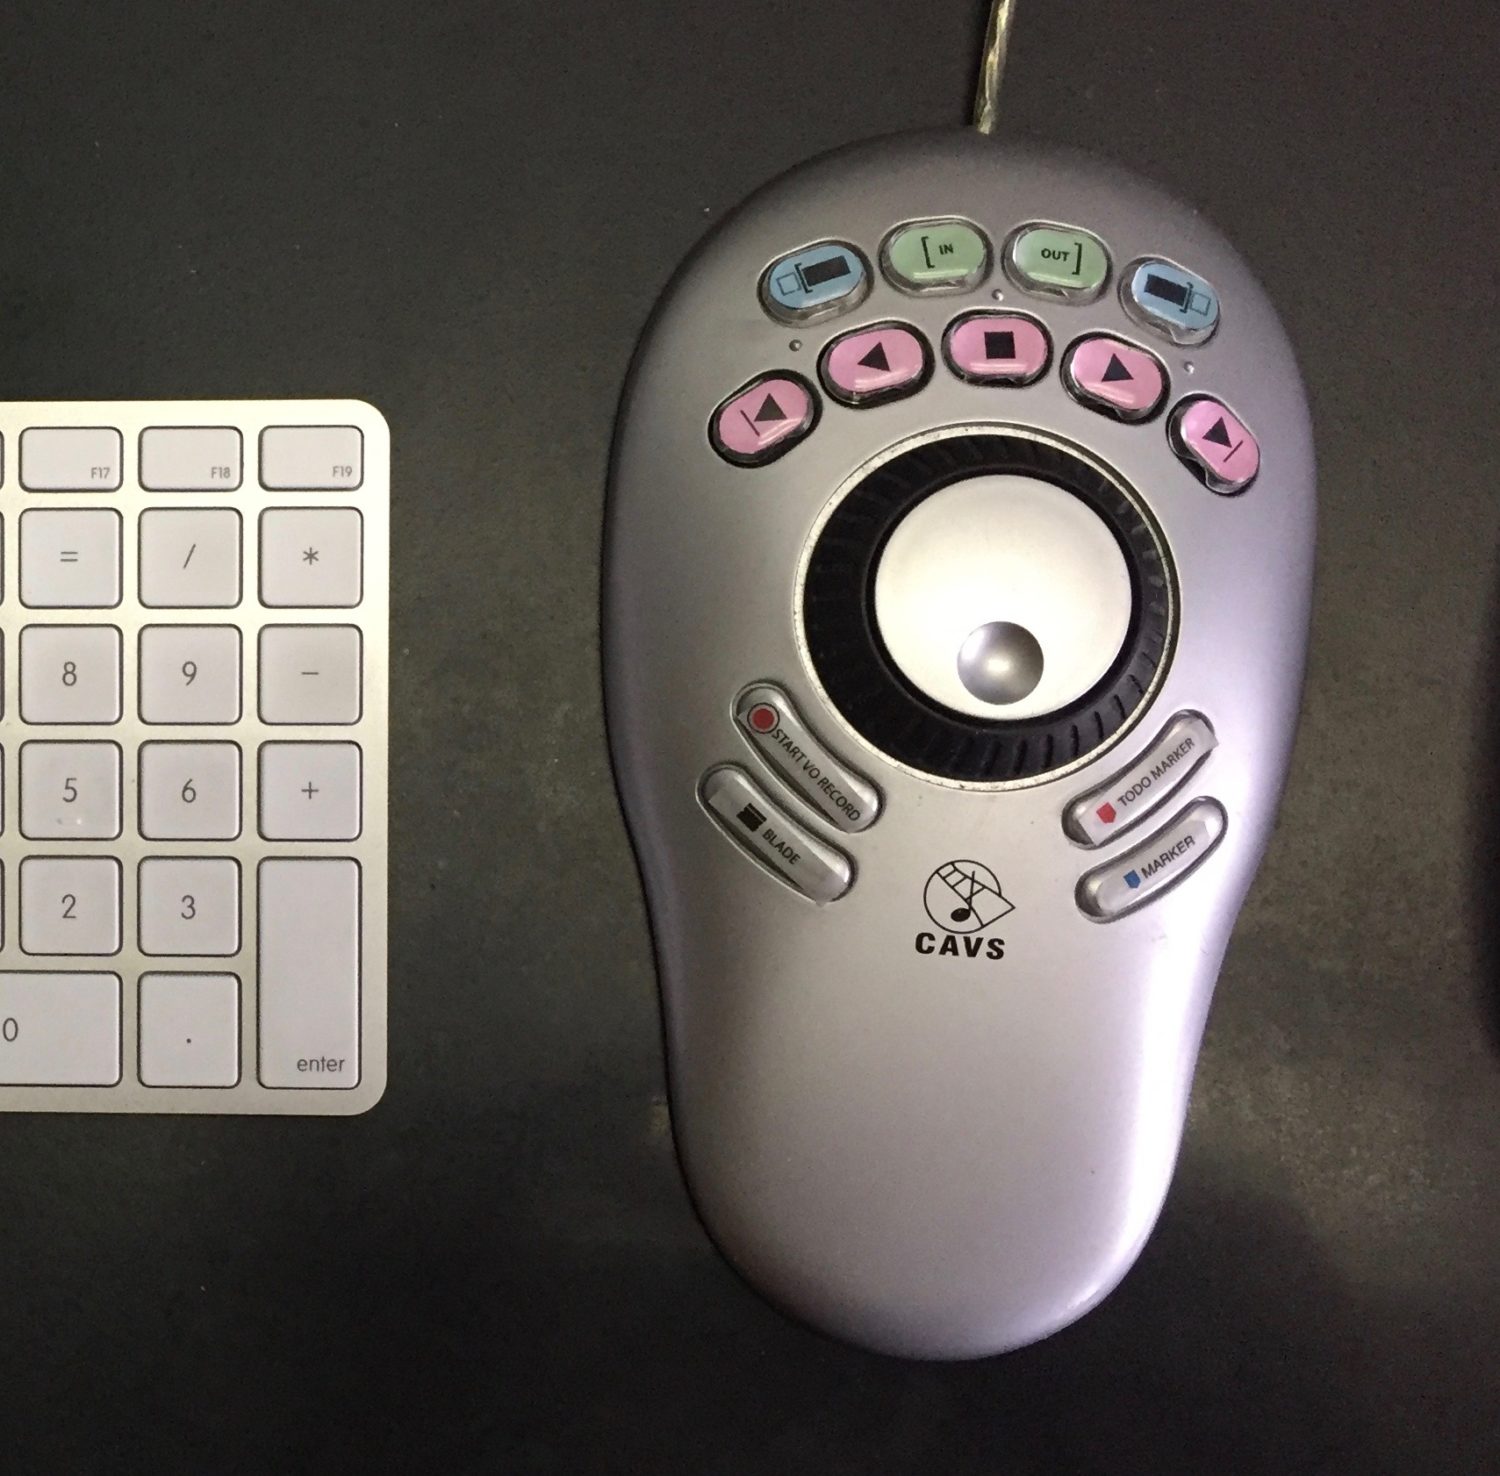
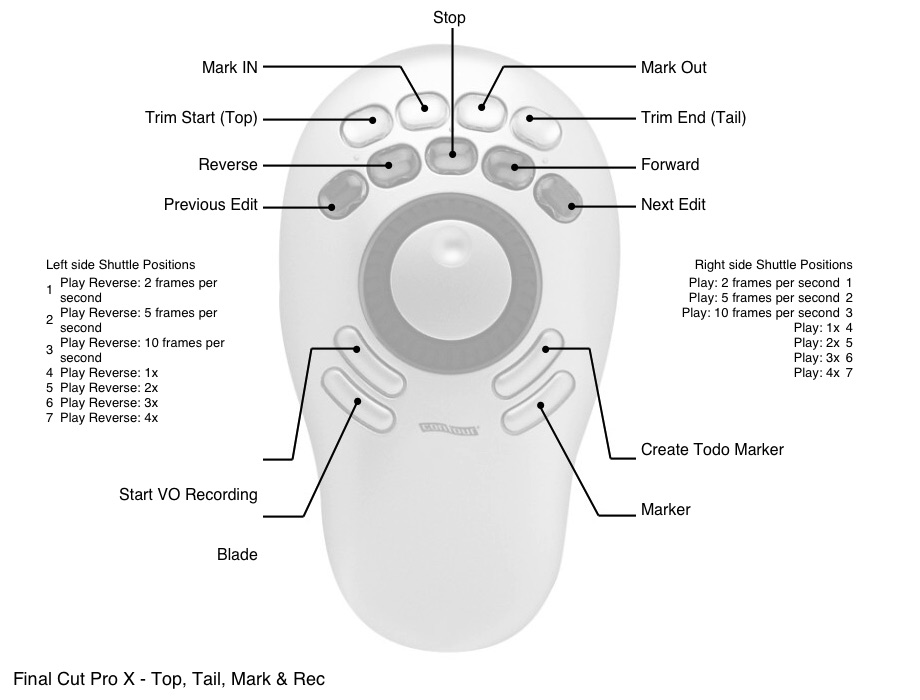
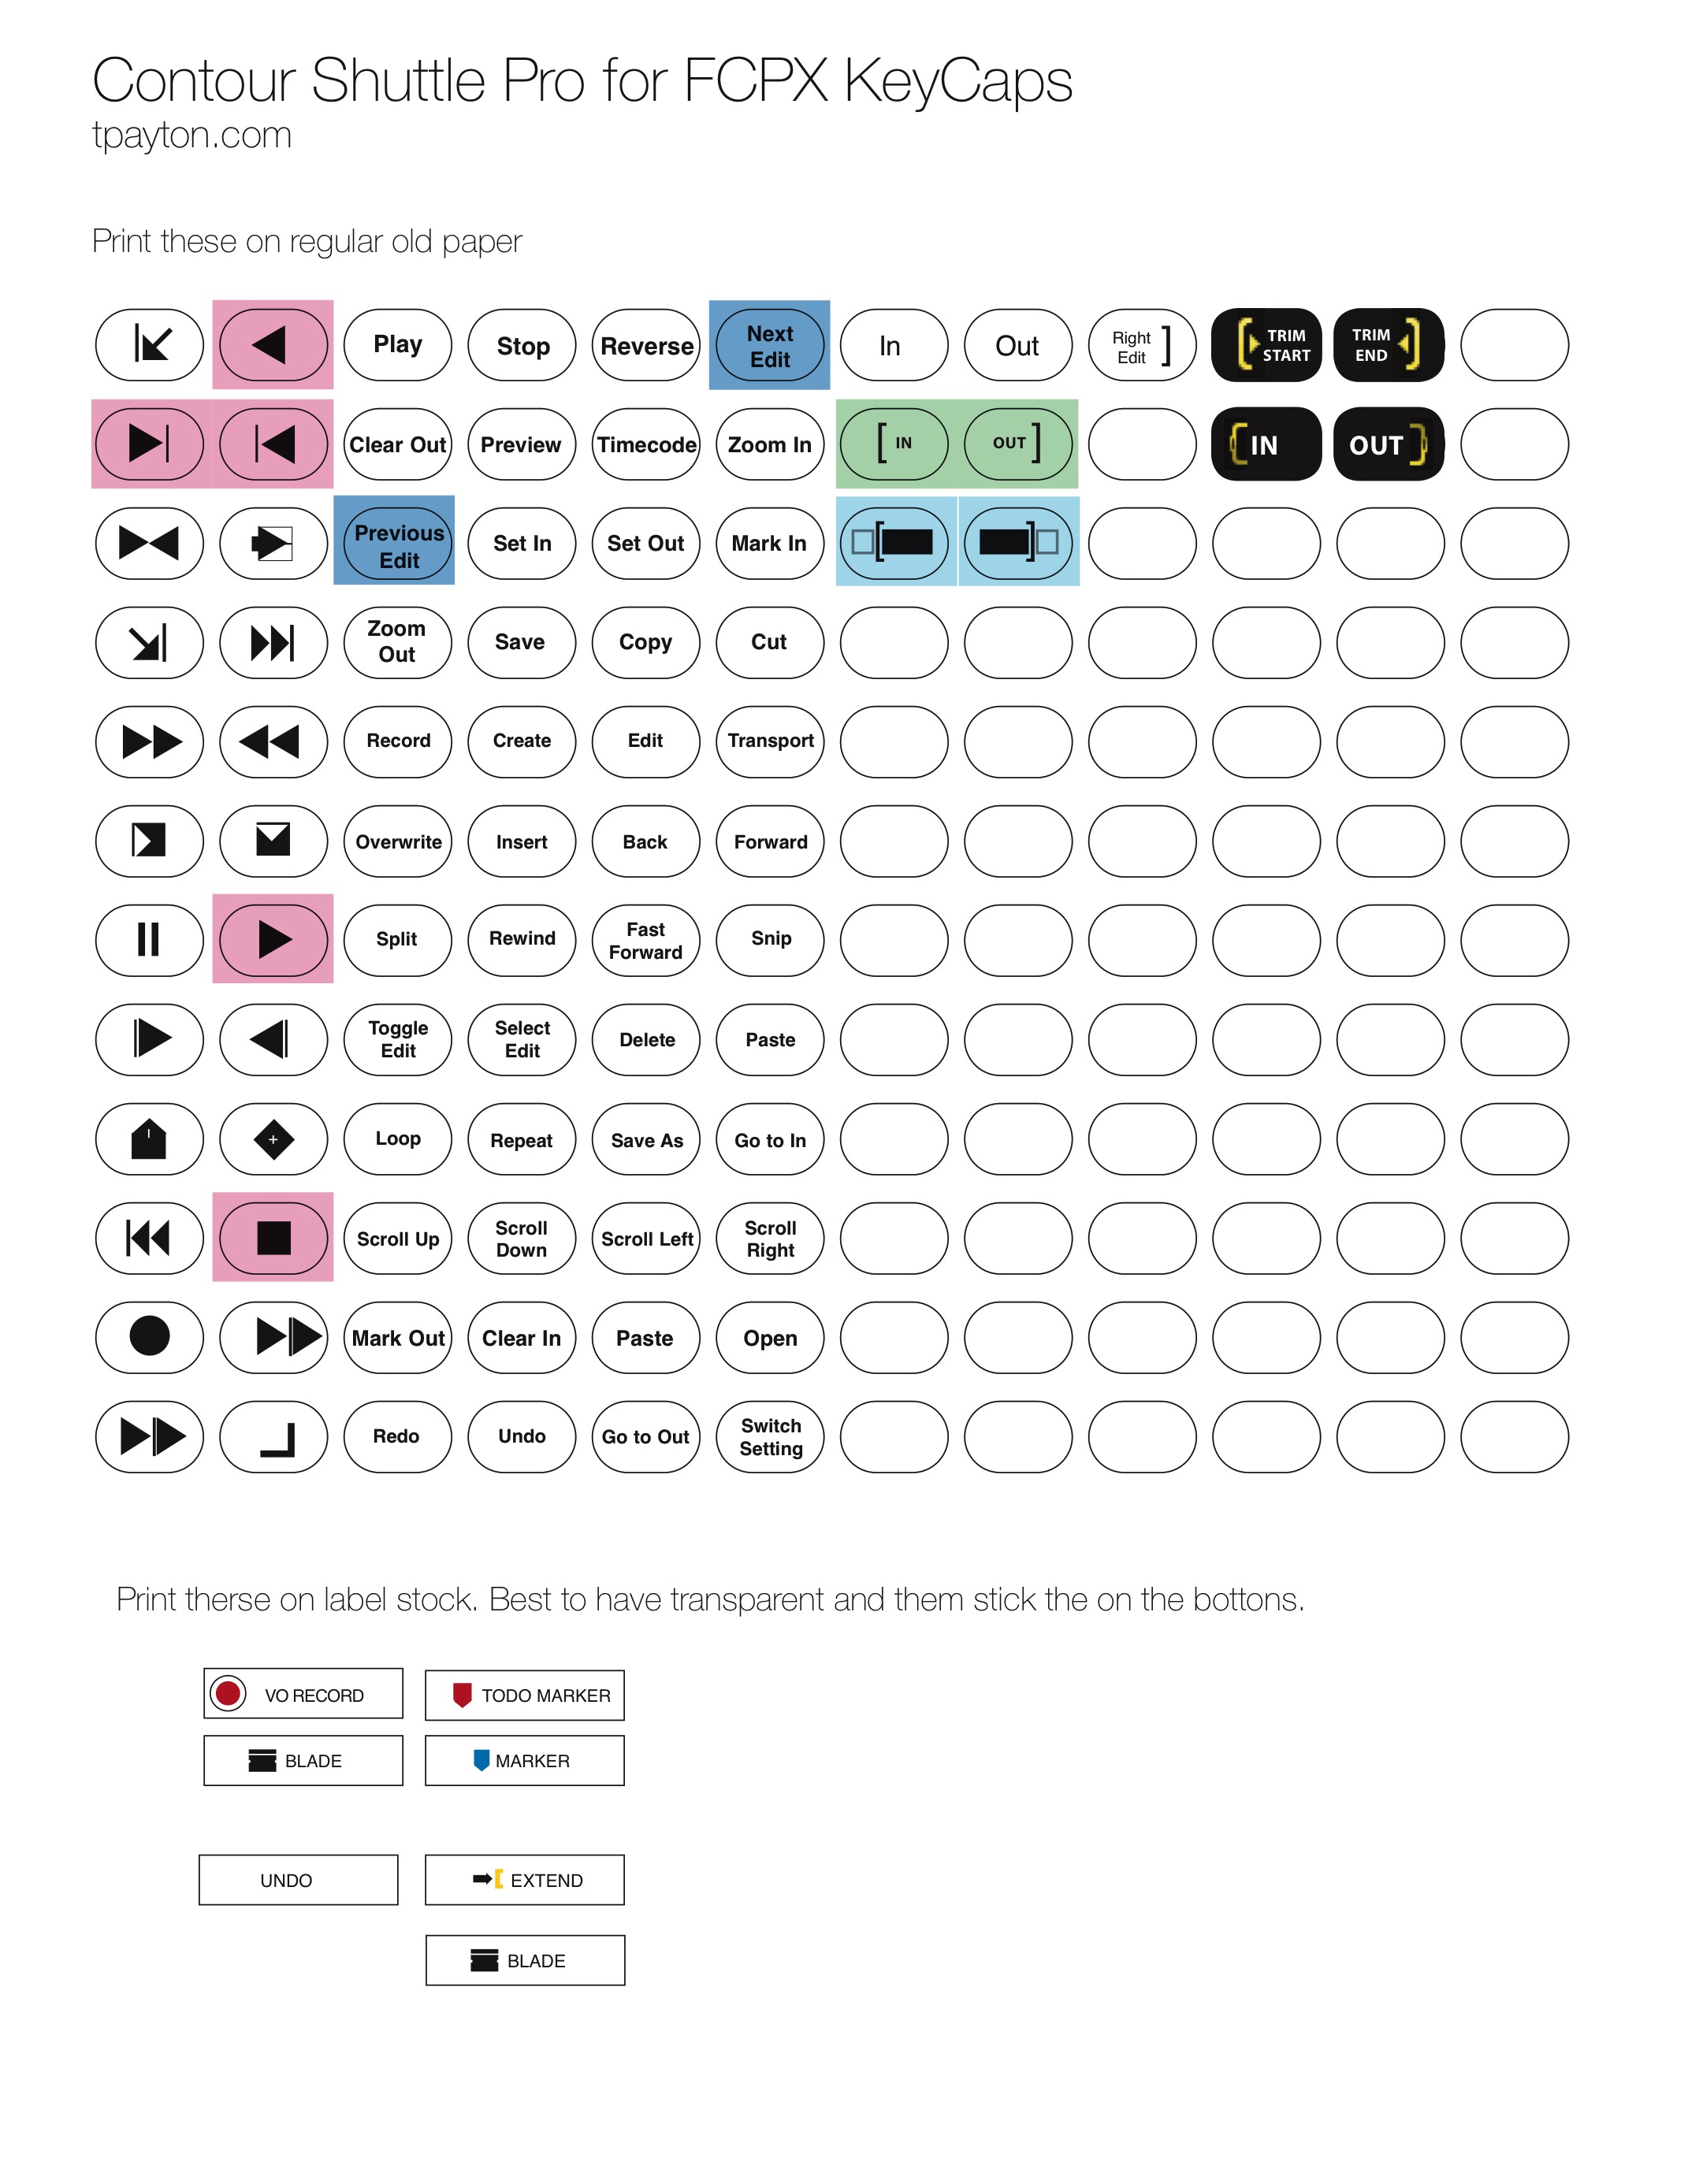
Way back in 2001 I purchased a Shuttle Pro for use with FCP and ProTools and I have loved this thing ever since (and it still works!) I wanted to share my settings for FCPX that I find most useful. Rather than edit, I really use the Shuttle Pro as a precision frame finding device, and then trimming or marking in and out with that frame. I do a lot of voice overs so I have a dedicated button just for that (use to start and stop recordings). To that end here are my settings for the 3.0 drivers, accompanying usage diagram, and even keycap labels to make it look uber cool.
May 2019 Mojave Driver Note – After a system reinstall I found that I couldn’t get the Mojave drivers for the Shuttle Pro to work (version 3.2). I downloaded the previous driver (version 3.0) and it is working just dandy.
Final Cut Pro X – Top, Tail, Mark & Record Settings (T. Payton)
Shuttle Pro Keycaps FCPX 4 (T. Payton)
Get the latest drivers from the Contour Site (see May 2019 note)